Aussie style
Welcome to my stop on the blog tour for "Take Flight"!
If you've been following the blog tour so far, you will already be enjoying the vibrant, happy colours and cheeky Australian birds of Amanda Brandl's debut collection for Kennard & Kennard Fabrics . They are quite simply the prettiest Australiana themed designs I've ever seen!
If you've been following the blog tour so far, you will already be enjoying the vibrant, happy colours and cheeky Australian birds of Amanda Brandl's debut collection for Kennard & Kennard Fabrics . They are quite simply the prettiest Australiana themed designs I've ever seen!

I was thrilled to become involved in the blog tour for Amanda's debut fabric collections "Take Flight" and "Bush Gum Blossoms". It's my debut blog tour too! 😄
I've been delighted to see how my fellow makers have been inspired by Taking Flight, as well as Bush Gum Blossoms. Sarah from Piccolo Studio has created an amazing quilt pattern which showcases the brightly coloured Taking Flight fabrics to perfection, while Kylie at Wombat & Poss has created very cute baby accessories. The lovely Ali at Arabesque Scissors is always inspiring with her pretty makes, and her pretty, scrappy quilt is gorgeous.

One of the many reasons the Take Flight range appeals to me is that I've been lucky to have lived close to the Australian bush all my life. Having a farmer Dad with an affinity for animals .... yay for birds and furries .... eek for snakes and lizards - meant we had frequent close contact with the local Australian animals as we grew up. Amanda's Dad is the same. Maybe it's a Dad thing 😄! Amanda's love for the beautiful Australian bush has been the inspiration for her charming designs.
This is Australiana at its prettiest.
Wouldn't Ali's second project, a fold-over clutch look great with this dress!

These photos were taken by my son at the Rockhampton Botanic Gardens, with my daughter-in-law very kindly (and patiently) agreeing to be the model.

I love how the white daisy trim highlights the freshness of the wildflower fabric.

I cobbled together two commercial patterns to make the dress, the same style as this earlier maxi-dress.

Do you wear Obi belts? I find them so versatile. They can be worn on the natural waist, high waist or on the hip depending on where you want to draw attention. They can also be double sided like the one I made to go with this dress.

This simple belt is very easy to make. For a plain belt
you will need
35 cm of fabric
15 cm low loft batting/Pellon
15 cm lightweight sew-in interfacing
* The fabric requirements will be different if you make a scrappy one.

Begin by measuring the part of the body where you want to wear the belt.
Cut 2 rectangles of fabric this measurement long x 13 cm wide.
Cut 1 piece of lightweight interfacing + 1 rectangle of Pellon the same size.
* If you want to make one side patchwork like mine, piece together your scraps until you can cut a pieced rectangle the same size as your first rectangle.
I wanted to make a feature of the beautiful birds so I cut my fabric scraps to make the best use of the fabric's designs.

Lay the interfacing on the table. Place the Pellon on top. Place your patchwork rectangle on top of that.
* If you want to stitch any quilting lines, this is the time to do it.
Now to make the ties.

Take your original waist measurement and add 80 cm.
Cut 2 rectangles this length x 4 cm wide.
* My ties are made from a different patterned fabric for each side.
Chances are you'll have to join a couple of strips to achieve this length. Join the strips using a mitred join to spread the seam allowance over a greater area. This prevents all the extra bulk ending up in one place. The arrow is pointing to where the seam will be stitched.
When you have created your 2 long strips, pin them together with the Right Sides Together (RST). Using a 1 cm seam, start stitching close to the mid-point along one long side. Stitch all the way around leaving about a 4 cm turning gap.
Trim the corners ...

... and turn out the right way through the turning gap.
* I'm using a fat knitting needle with a bluntish point, but a skewer with the pointy end snipped off would also work.


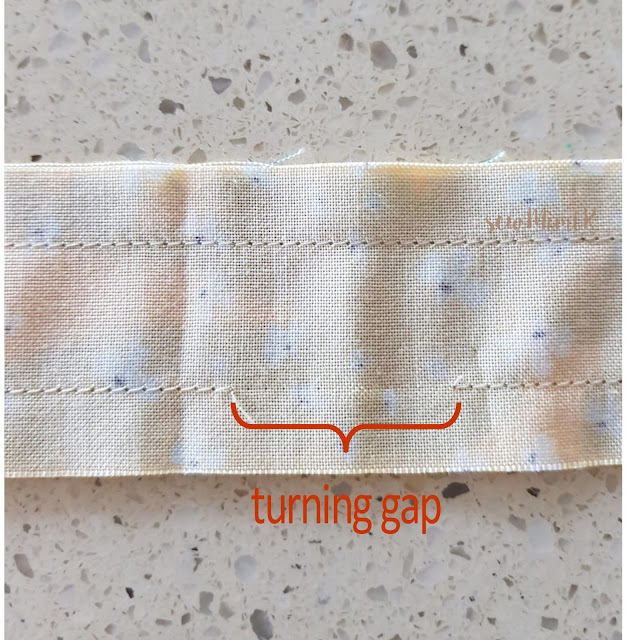
Lay the pieced rectangle on top with RST. Stitch together using a 1.5 cm seam all the way around, leaving a turning gap of about 8 cm long in one long side, near the end.


If you'd like to make a belt just like mine you can find a list of stockists for the fabric here .

Thursday March 15th: Kylie | Wombat & Poss
Friday March 16th: Ali Phillips | Arabesque Scissors
Monday March 19th: Kellie | Me 😄 Tuesday March 20th: Robyn MacWilliam | Bumblebee Boutique
Wednesday March 21st: Michelle Hickson | Cole and Taffy
Thursday March 22nd: Anne Boundy | Said With Love
Friday March 23rd: Ange Hamilton | A Little Patchwork
Monday March 26th: Vickie Zaleski | Crocheting Vixen
Tuesday March 27th: Wendy Gontier | Wehago Designs
Wednesday March 28th: Elise Baek | Elise and Emelie
Thursday March 29th: Samantha Green | For The Love Of Fabric
Friday March 30th: Sharon Burgess | Lilabelle Lane Creations
Monday April 2nd: Rose Johnstone | Threadbare Creations
Tuesday April 3rd: Jess & Laura | Two of a Kind
Wednesday April 4th: Raylee Bielenberg | Sunflower Stitcheries
Thursday April 5th: Blog Wrap up | Amanda Brandl

This simple belt is very easy to make. For a plain belt
you will need
35 cm of fabric
15 cm low loft batting/Pellon
15 cm lightweight sew-in interfacing
* The fabric requirements will be different if you make a scrappy one.

Begin by measuring the part of the body where you want to wear the belt.
Cut 2 rectangles of fabric this measurement long x 13 cm wide.
Cut 1 piece of lightweight interfacing + 1 rectangle of Pellon the same size.
* If you want to make one side patchwork like mine, piece together your scraps until you can cut a pieced rectangle the same size as your first rectangle.
I wanted to make a feature of the beautiful birds so I cut my fabric scraps to make the best use of the fabric's designs.

Lay the interfacing on the table. Place the Pellon on top. Place your patchwork rectangle on top of that.
* If you want to stitch any quilting lines, this is the time to do it.
Set your patchwork rectangle aside with your original, plain rectangle.

Take your original waist measurement and add 80 cm.
Cut 2 rectangles this length x 4 cm wide.
* My ties are made from a different patterned fabric for each side.
Chances are you'll have to join a couple of strips to achieve this length. Join the strips using a mitred join to spread the seam allowance over a greater area. This prevents all the extra bulk ending up in one place. The arrow is pointing to where the seam will be stitched.
When you have created your 2 long strips, pin them together with the Right Sides Together (RST). Using a 1 cm seam, start stitching close to the mid-point along one long side. Stitch all the way around leaving about a 4 cm turning gap.

Trim the corners ...

... and turn out the right way through the turning gap.
* I'm using a fat knitting needle with a bluntish point, but a skewer with the pointy end snipped off would also work.

Press flat.
* I also top stitched along each edge, but you don't have to.
Cut in half.
* I also top stitched along each edge, but you don't have to.
Cut in half.

Pin the raw end of one tie in the middle of the short end of your original rectangle. It may help to hold the tie in place for the next stage, if you stitch a few stitches parallel to the raw edge. Repeat, adding the other tie to the other end of the rectangle.

Lay the pieced rectangle on top with RST. Stitch together using a 1.5 cm seam all the way around, leaving a turning gap of about 8 cm long in one long side, near the end.
Clip the four corners and turn inside out through the turning gap.

Press flat.
Top stitch close to the edge all the way around. This will close the turning gap.
Ready to wear!
Top stitch close to the edge all the way around. This will close the turning gap.
Ready to wear!


I hope you've enjoyed my stop on the blog tour. I can't wait to see what everyone else has been making,
xo
P.S. Pop over to Arabesque Scissors blog for the chance to win a delightful bundle of new release fabric in Ali's fabric giveaway .
Join the other marvellous makers for their stops on the blog tour
Wednesday March 14th: Sarah Scott | Piccolo StudioThursday March 15th: Kylie | Wombat & Poss
Friday March 16th: Ali Phillips | Arabesque Scissors
Monday March 19th: Kellie | Me 😄 Tuesday March 20th: Robyn MacWilliam | Bumblebee Boutique
Wednesday March 21st: Michelle Hickson | Cole and Taffy
Thursday March 22nd: Anne Boundy | Said With Love
Friday March 23rd: Ange Hamilton | A Little Patchwork
Monday March 26th: Vickie Zaleski | Crocheting Vixen
Tuesday March 27th: Wendy Gontier | Wehago Designs
Wednesday March 28th: Elise Baek | Elise and Emelie
Thursday March 29th: Samantha Green | For The Love Of Fabric
Friday March 30th: Sharon Burgess | Lilabelle Lane Creations
Monday April 2nd: Rose Johnstone | Threadbare Creations
Tuesday April 3rd: Jess & Laura | Two of a Kind
Wednesday April 4th: Raylee Bielenberg | Sunflower Stitcheries
Thursday April 5th: Blog Wrap up | Amanda Brandl
Absolutely gorgeous makes Kellie! You’ve done such an amazing job and those fabrics are so pretty!
ReplyDeleteThank you so very much Megan, it's been a pleasure to work with these beautiful fabrics xo
Deletestunning dress!!
ReplyDeleteThank you Anne! Not long until it's your blog stop :) x
DeleteSuch a pretty dress Kellie! That yellow is such a happy colour, and I adore the cockatoo fabric, too.
ReplyDeleteThank you very much Sarah :) Those cockatoos look ready to squawk! Amanda has captured all the birds personalities really well xox
Deleteabsolutely gorgeous
ReplyDeleteThank you Susie, and I'm sorry it's taken me so long to reply to your very kind comment. It's such a lovely shade of yellow, and of course those white wildflowers are just the prettiest!
Delete